Rebuilding ESP32-fluid-simulation: overview of tasks and intertask communication in FreeRTOS (Part 1)
I graduated from college a couple of months ago, and ever since I’ve been interested in revisiting the things I put out while I was still learning. In particular, I obsessed over how I could make it appear more accessible and more professional. To that end, I decided that I needed to tie my works closer to established research and—if not that—fundamental concepts that are easy to look up. I had been trying that with my blog posts, but this new post is about ESP32-fluid-simulation, namely one of my old projects about fluid simulation on an ESP32.
Coincidentally, I was lurking on Brian Lough’s Discord channel when I learned of a cool new development board, packing an ESP32 and a touchscreen. Retailing for just about $14 when you count shipping, it was far more accessible than the RGB LED matrix I was using back then. It seemed like a perfect platform to target my new edition of this old fluid sim, and I could even add touch input while I was at it.

So, how did this project get built again using established research and otherwise stuff you can look up? I’m trying to be thorough here, so this will actually be the first out of three posts. Where we start and where I started is at the highest level: the breakup of a single loop that does everything into many loops that are smaller, share time on a processor, and communicate with each other. (This is also the perfect chance to show what this project does at a high level.) After this post, we can get to the input, rendering, and simulation itself.
What allows a processor to split its time and facilitate this communication is a “real-time operating system” (RTOS). I don’t have the expertise to summarize everything that an RTOS is, but I can safely say that two things (not exclusive) that an RTOS can do, split processor time and facilitate communication, are things an “operating system” (OS) can do generally. Why this disclaimer? My knowledge about these features mainly comes from a lesson in parallel programming on Linux that I took in school. This and “concurrent programming” on an RTOS have some overlapping concepts, but they’re not the same. In fact, the difference led me to a real trip-up as I was rewriting this project, and I can detail how this happened along the way.
The part of operating systems—generally—that allows a processor to split time is the scheduler. Let’s lay out the characteristics of the scheduler that gets used in the ESP32. The ESP-IDF comes with its own distribution of the open-source FreeRTOS, this version being called “ESP-IDF FreeRTOS”, and it can be shown that it roughly matches the default configuration. That configuration is “preemptive” scheduling with “round-robin time-slicing” for “equal priority tasks”. What do all those keywords mean? “Preemptive” means that splitting processor time is achieved by having higher-priority loops (“tasks” in FreeRTOS terminology) interrupt lower-priority loops. With few exceptions, higher-priority tasks always interrupt lower-priority tasks. These tasks do what they do and then stop interrupting, though they themselves can be interrupted by even higher-priority tasks. The below diagram shows one example of how this happens.
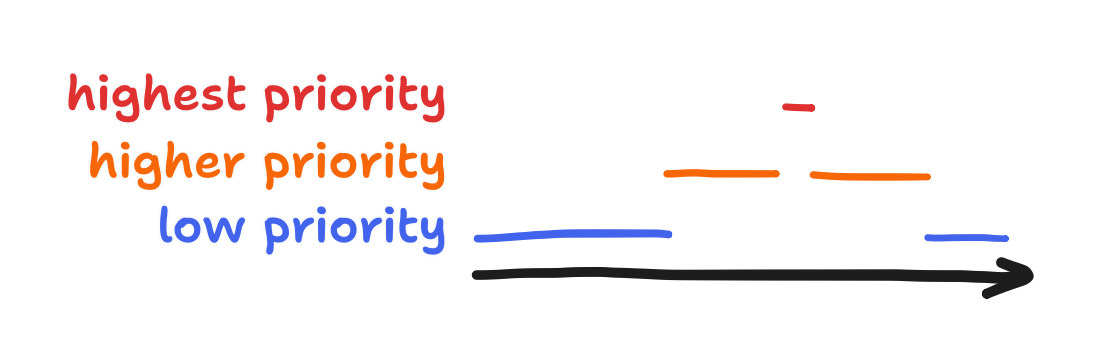
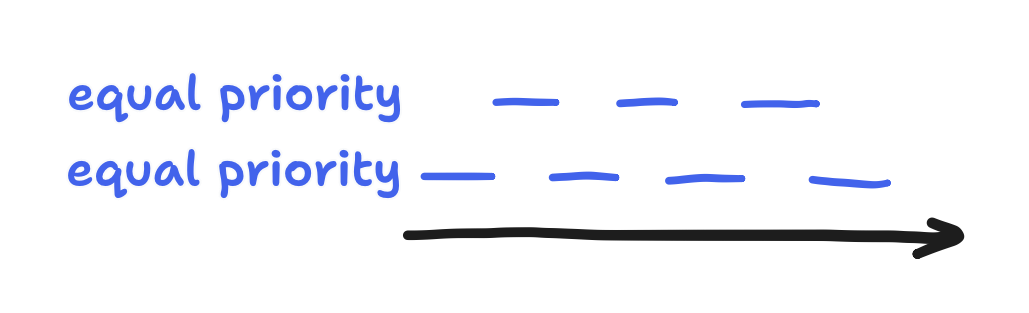
“Round-robin time-slicing” for “equal priority tasks” just means that tasks take turns in the case of a tie.
When the scheduling works, all tasks can appear to be running at the same time!
Still, this scheduler behavior isn’t the same as in Linux. On one hand, a high-priority task is guaranteed to run on time, barring even higher-priority tasks and said exceptions (keyword “priority inversion”). On the other, if a high-priority task runs forever, then a lower-priority task never runs. That’s been termed “starvation”. This is what I accidentally caused, but to describe how I got there, we need to lay out the actual tasks that make up the project along with that other feature of an RTOS I mentioned: facilitating communication between tasks.
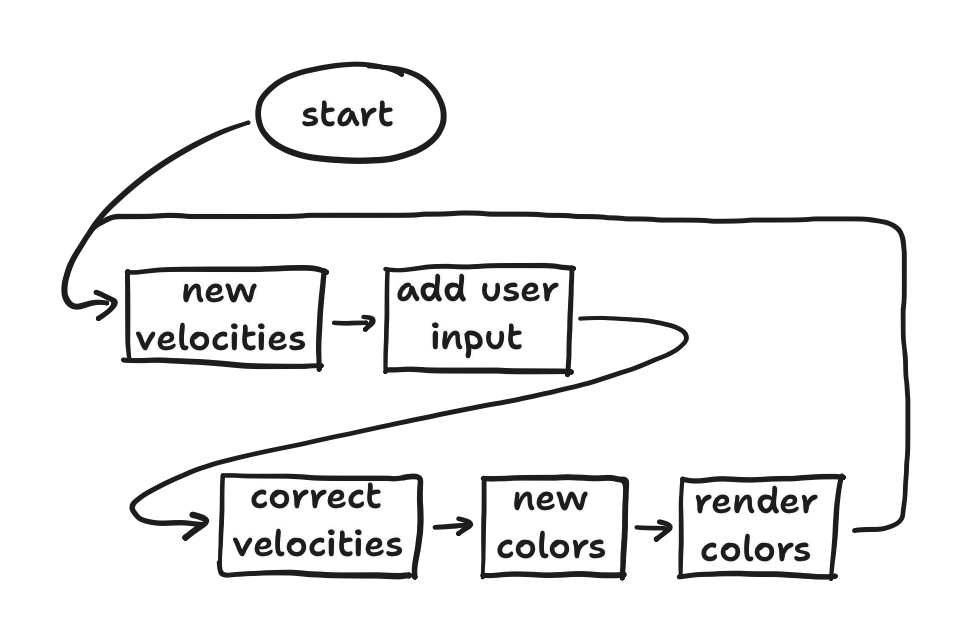
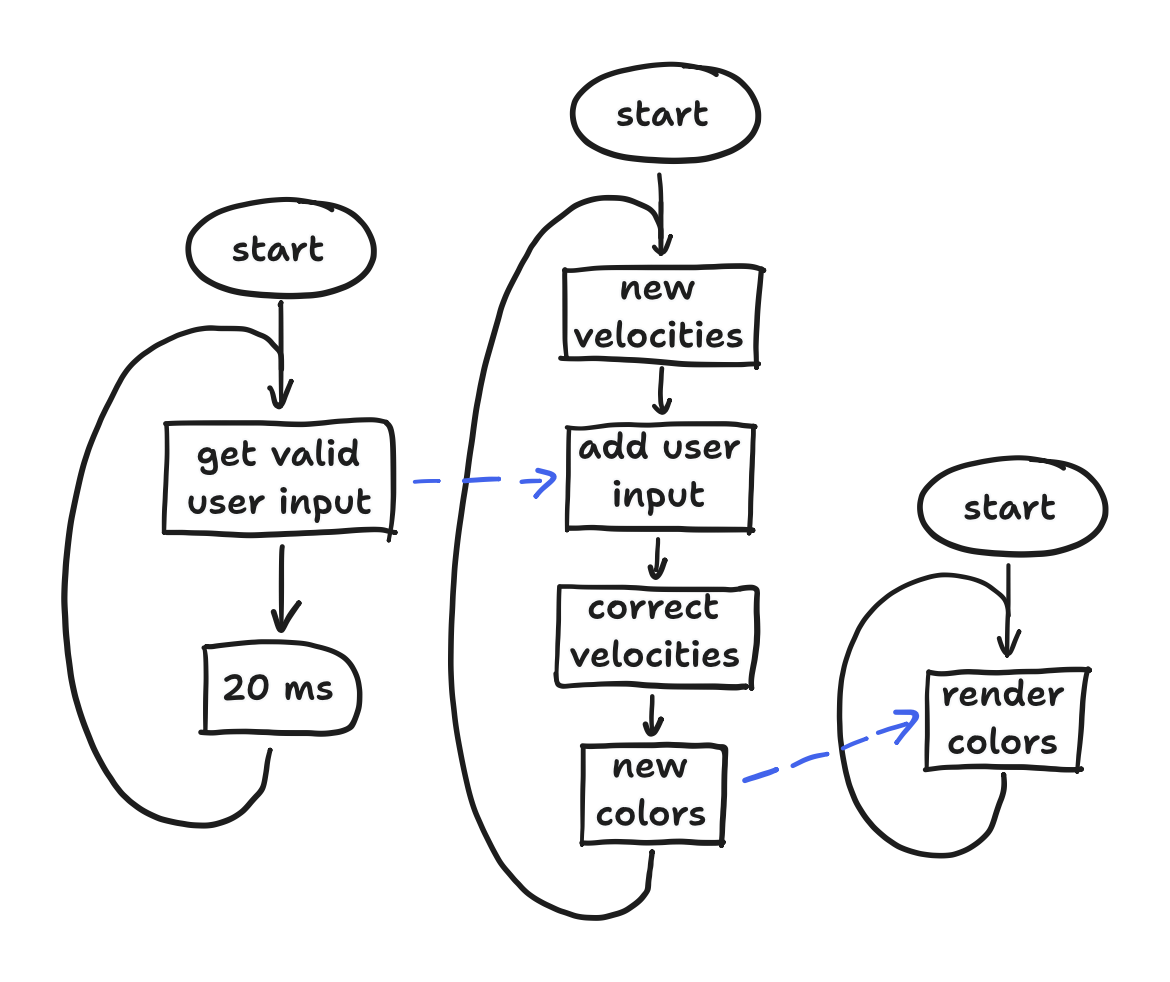
Originally, ESP32-fluid-simulation was written like any other Arduino project. It used the setup() and loop() functions for code that ran once and code that ran forever, respectively. Putting aside the code in setup(), the loop() function had five general blocks: (1) calculate new internal velocities, (2) add user input to the new velocities, (3) correct the new velocities, (4) calculate new fluid colors using the corrected velocities, and finally (5) render the new colors. For context, we capture everything we want to model about the fluid using just the internal velocities and color, but we’ll get to that in a later post. Altogether, this sequence can be visualized with a simple flowchart, showing the whole big loop.
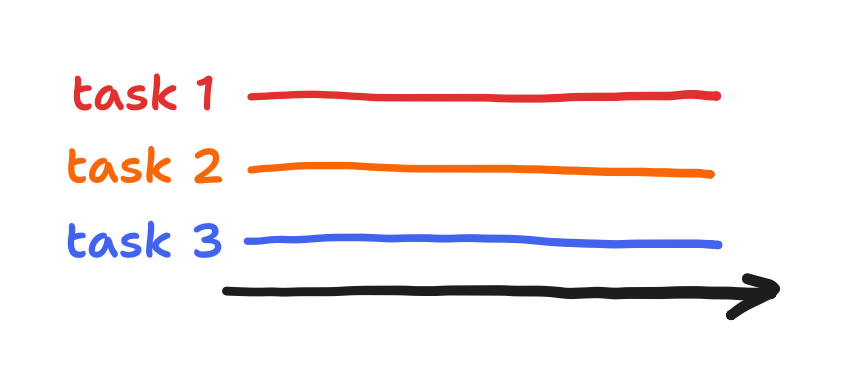
However, the Arduino core for ESP32 was written on top of ESP-IDF, and we’ve already established that the ESP-IDF uses FreeRTOS. As a result, all FreeRTOS functions can be called in Arduino code (not even a header #include is needed!). So, I immediately broke out the five blocks into three tasks: an touch task, a simulation task, and a render task. In each task, the input of a block might be the output of another block that sits in another task, and we’ll get the data across… somehow. We’ll get to that. With this in mind, we can at least update the flowchart to show three concurrent tasks and the data dependencies between them.
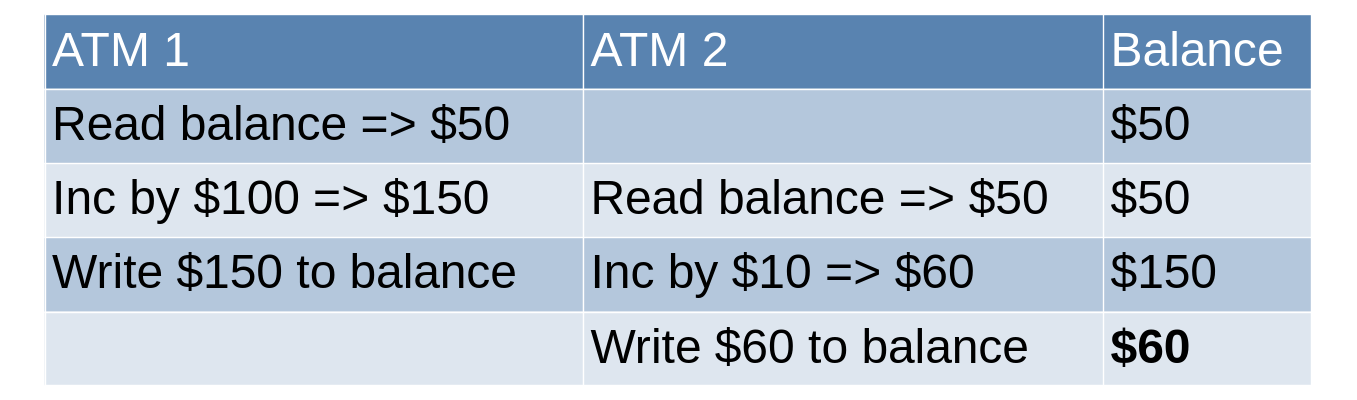
The missing thing here is the facilitation of communication, which I left exclusively to FreeRTOS. To be more precise, FreeRTOS offers a couple of “synchronization primitives” that can be used to guarantee that “race conditions” never happen. Ignore using synchronization primitives in your concurrent applications at your own peril, for “race conditions” mean that the result depends on whatever way the scheduler executes your tasks. In other words, you can’t depend on the result at all! For example, the classic bank account example shows how a badly coded ATM network can vanish your money, thanks to a race condition.
I can’t cover every synchronization primitive, but the two I need to cover are the “binary semaphore” and the “mutex”. I’ll also cover the “queue”, an all-in-one package for safe communication that FreeRTOS offers. (You can see the FreeRTOS documentation for the rest, but the guide to FreeRTOS offered by Digikey is also useful.) As we cover these in the context of my three tasks, we’ll also be able to go over my trip-up.
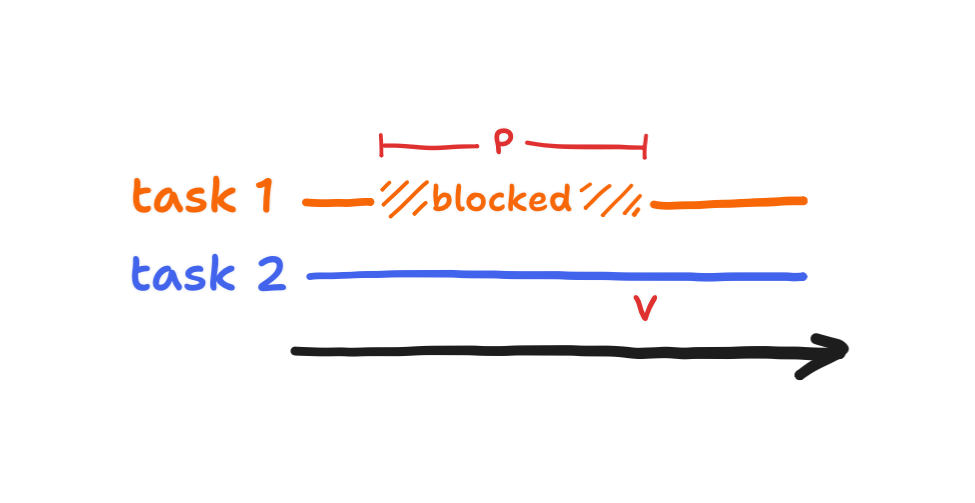
A “mutex” is the canonical solution to our bank account race condition. A task must “take” the mutex, read and write the balance (in general, any shared memory), and finally “give” back the mutex. Because no interrupting task can take a mutex that is already taken, the race condition is prevented! This guarantee is called “mutual exclusion”. Furthermore, while the interrupting task cannot take the mutex it is forced to wait until it can, and in that time the scheduler is free to run lower-priority tasks. When the interrupting task runs into this, it’s in a “blocked” state.

A “binary semaphore” has a different canonical purpose. Quite simply, one task is blocked until another task says it can go ahead, and this go-ahead flag is then reset after that. Because the other task gives the go-ahead, it can also complete any operations it needs to complete before then. This guarantee is called “precedence”.
Finally, I’ll only be vague here because the FreeRTOS documentation on “queues” is clear enough already: besides the classic synchronization primitives, an all-in-one package for communication between tasks, called a “queue”, is also offered. Tasks can just send to the queue and receive from the queue—all without triggering race conditions. Further, if a task is sending to a full queue or receiving from an empty one, it is blocked. They’re quite convenient in that sense!
All said, when I say that a task is “blocked”, that’s because we’re using the “blocking” mode. FreeRTOS also offers a “non-blocking” mode that instead lets the task do something else, and this non-blocking mode also offers the same guarantees. In all cases except one, I used the blocking mode.
Moving on, how do these apply to our three tasks? Between the touch task and the simulation task, I just needed the touch task to pass along valid touches to the simulation task. For that, I defaulted to a queue, and I used the non-blocking mode here to make the simulation task receive everything in the queue but move on after that. I left the touch task to send into the queue in the blocking mode. Between the simulation task and the render task, however, the semantics of a queue didn’t make much sense. After all, would I really “send” a set of large arrays (representing fluid color) between tasks? Instead, I allocated a single set of arrays and managed to make the two tasks share the set without race conditions. The race conditions I was anticipating: the simulation task starts updating the fluid colors while the render task is still reading them, or the render task starts reading while the simulation task is still writing.
At first, I thought that I only needed a mutex. If I wasn’t using an RTOS, this technically would’ve worked, but therein lay my problem. I needed semaphores instead. Why I couldn’t do without semaphores has to do with the preemptive scheduling built into FreeRTOS. Because the render task happened to have a higher priority than the simulation task, it would take the mutex, give it back, and then immediately take it back again.
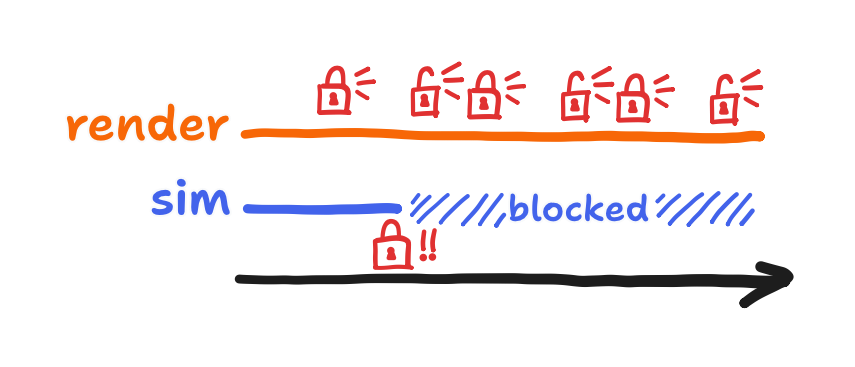
Nothing stopped the render task from running forever, and so the simulation task was starved. If the scheduler was more like the Linux scheduler or if the tasks were on equal priority, then the simulation task technically would’ve gotten to take the mutex eventually. But I’m glad that I wasn’t technically correct because that forced me to acknowledge the semaphore-based solution to the race condition. This solution also worked on FreeRTOS and didn’t involve the processor wasting time on a task that spun between taking and giving back the mutex endlessly. Using binary semaphores, I got this: a write is always preceded by a complete read, and a read is always preceded by a completed write. In the following diagram, the former is represented by semaphore “R”, and the latter is represented by semaphore “W”.
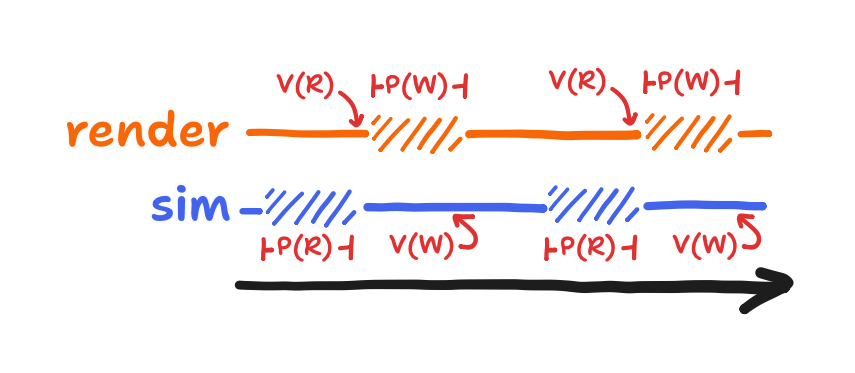
Each semaphore prevented one of the race conditions, but they also blocked the tasks from spinning.
Now with the queue and these binary semaphores in mind, that completes how I broke apart a single Arduino loop() into smaller tasks that safely pass data to each other. To visualize it in its entirety, we can update the flowchart with this communication.
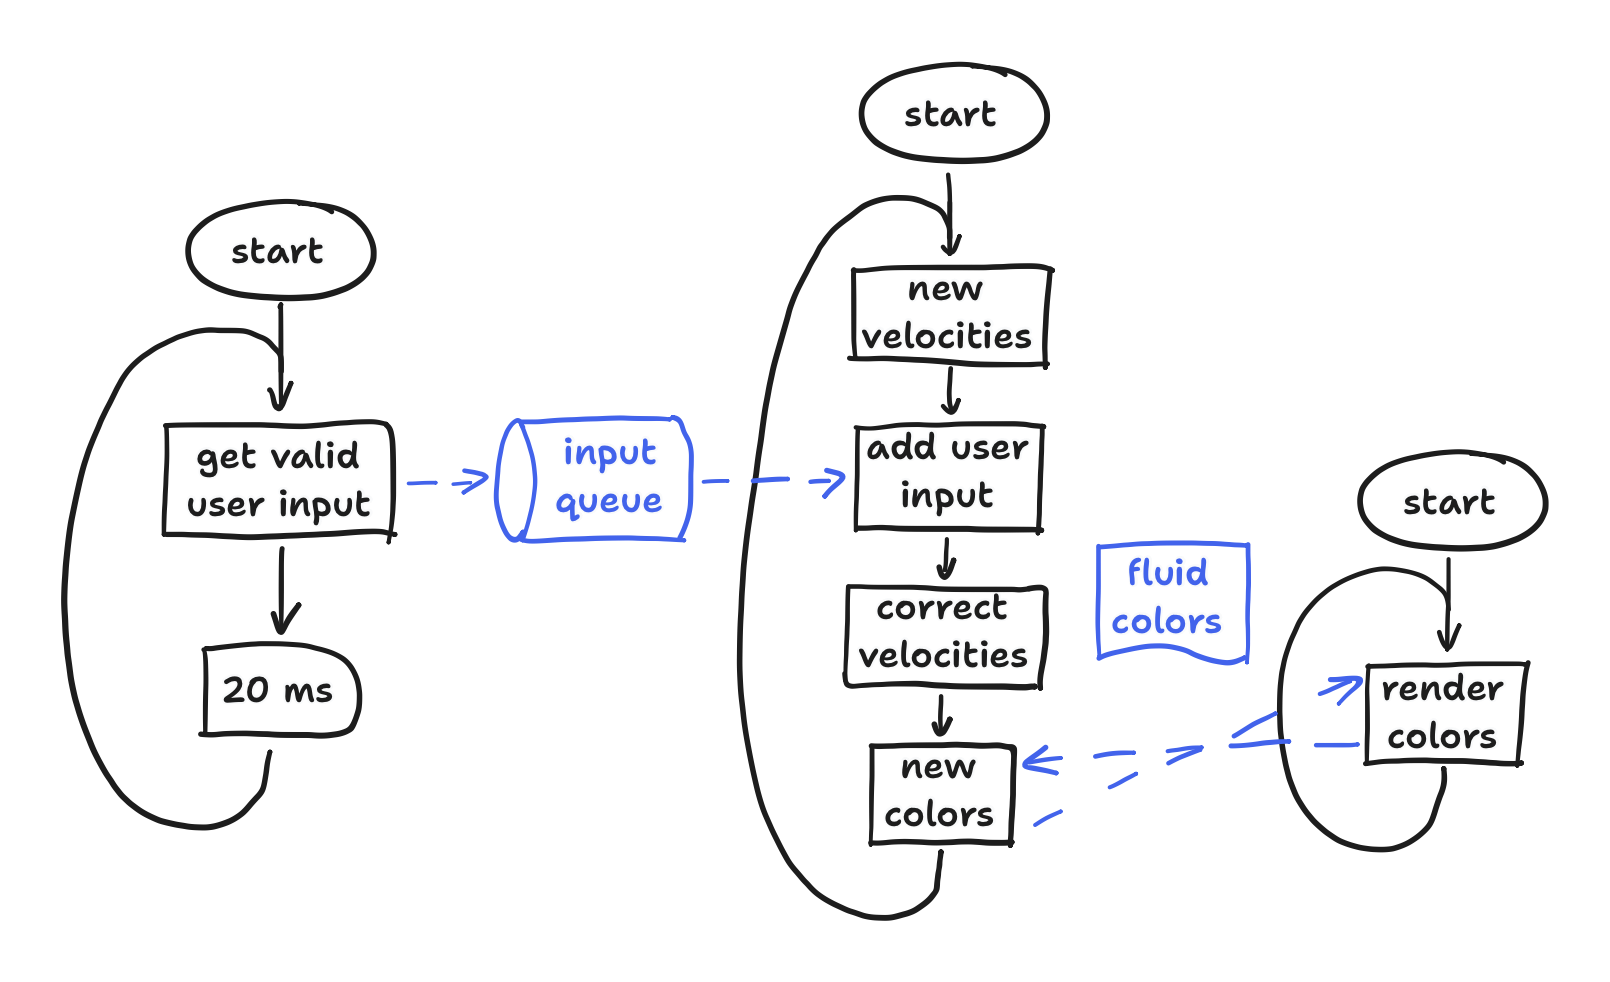
To explain the symbols a bit, the pipeline symbol stands for the queue, and the document symbol stands for the shared fluid colors. The dashed arrows represent communication between the tasks, pointing from where it’s initiated to where it’s awaited. (As we’ve established, they literally do wait for it!)
All said, while this post and flowchart emphasized the concurrent programming with safe communication that FreeRTOS offers, it also happens to serve as a high-level overview of this reimagining of my old project—and from a task-focused perspective at that! This nicely sets the stage for explaining what each task does in the next posts. Stay tuned to read about the touch and render tasks in the next post!
If you’re already here before that post comes out though, there’s always the code itself at the ESP32-fluid-simulation repo on GitHub.